
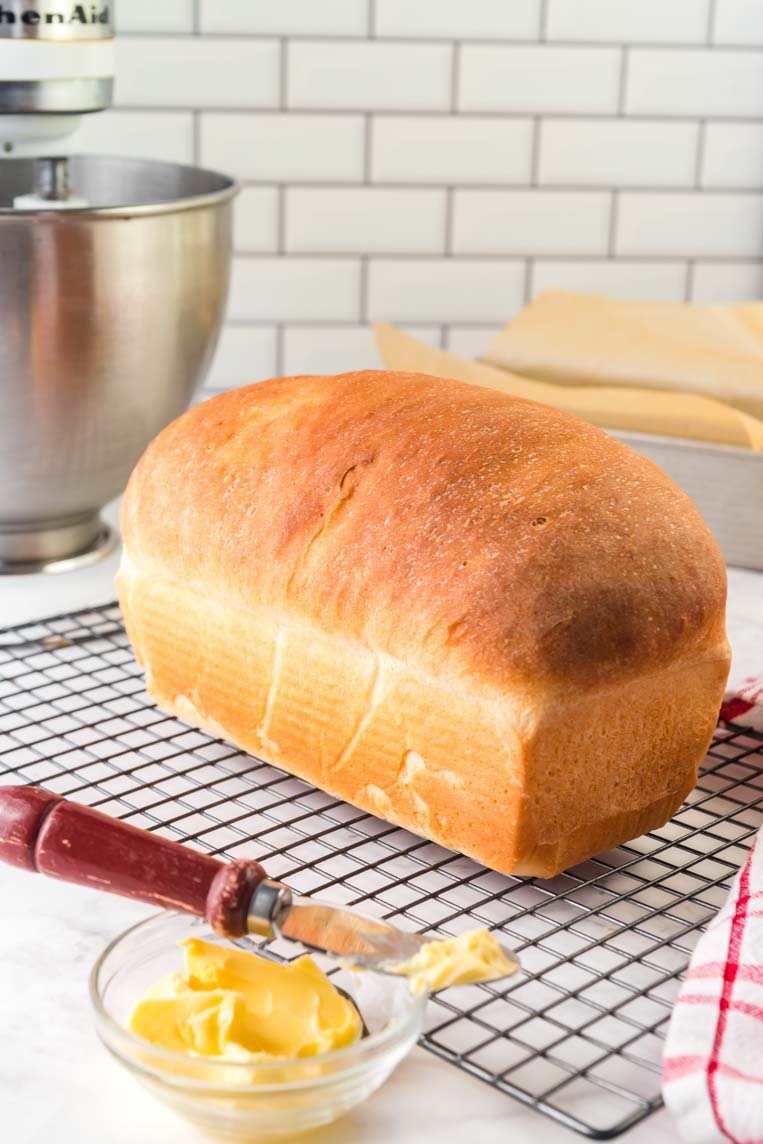
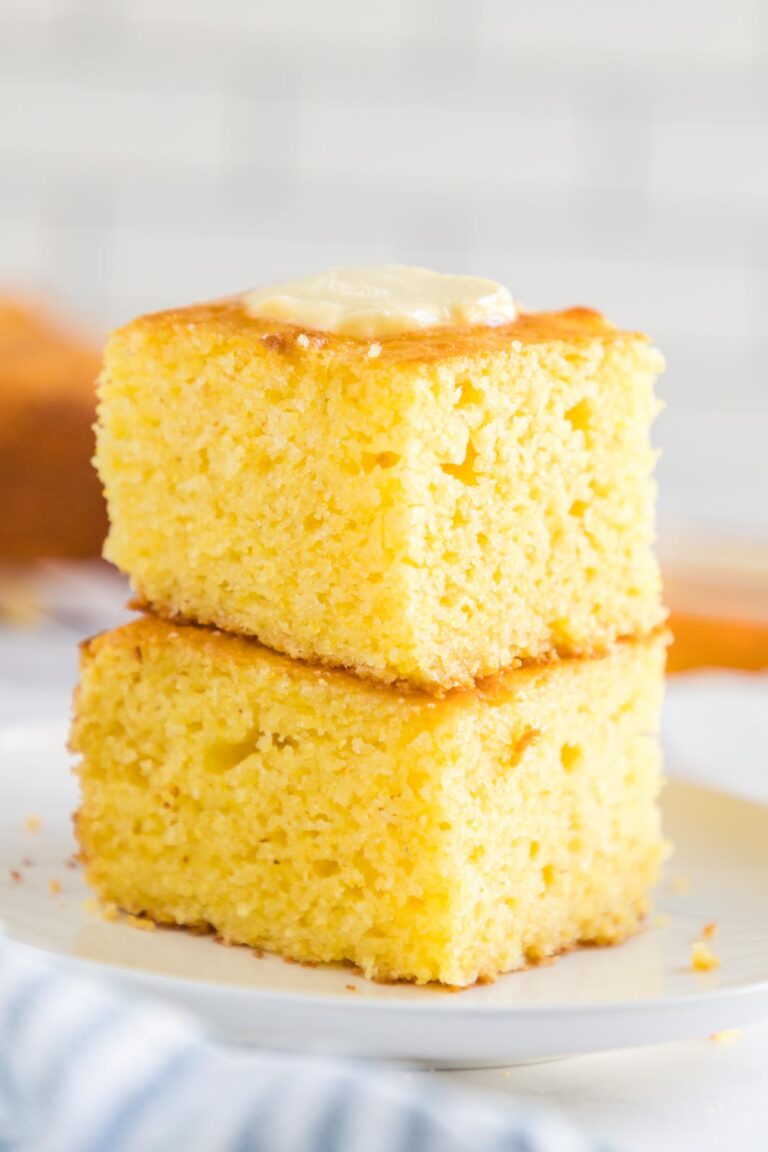
Single Loaf Bread in a Stand Mixer
Make a single loaf of bread in a stand mixer for just the right size batch with minimal effort. Tender and flavorful, this classic white bread can be made with a little bit of whole wheat flour or flavored with herbs and cheese. It’s a classic!
The smell of a classic loaf of bread is something that every new baker wants to tackle. And you should.
As a beginner the Dabbler team always recommends starting with recipes that you can get your hands in first. That way you can learn how dough should feel and look before you let a stand mixer take the lead.
But it looks like you’re ready.
Here’s what you need to know more than anything else when making loaf bread with a stand mixer:
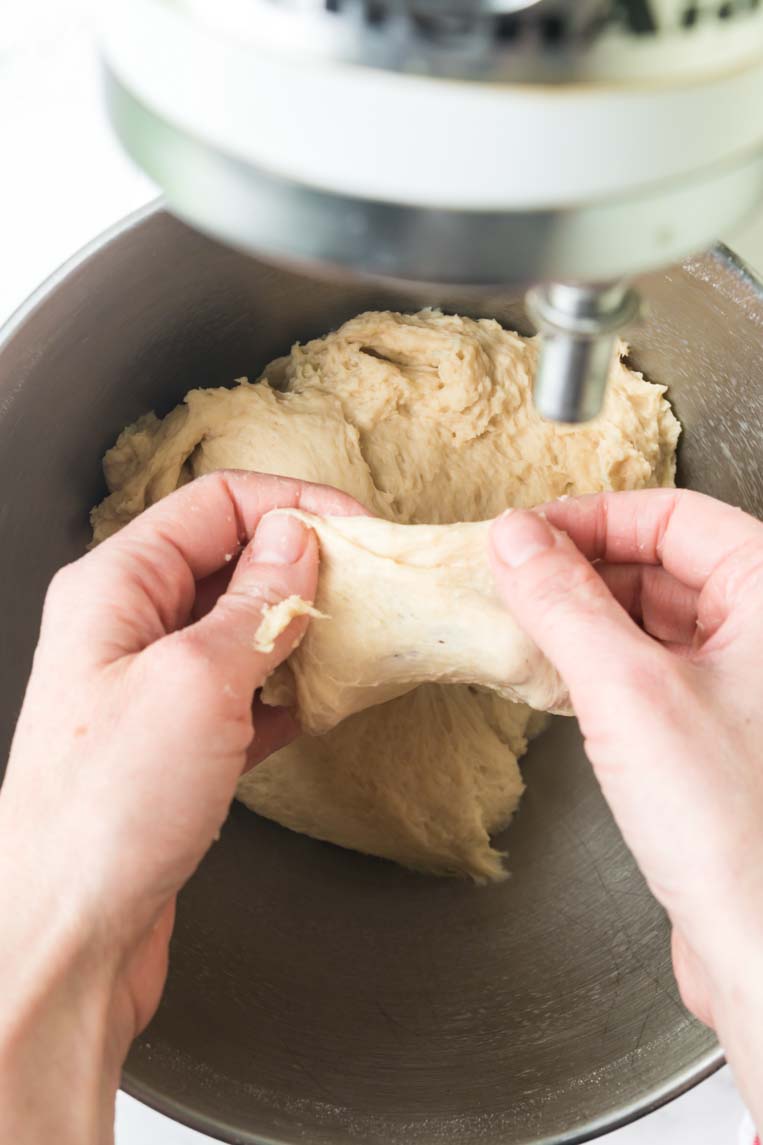
Mixers are good at overworking dough quickly. Make sure to pay attention to what’s happening in your bowl and check your single loaf often during mixing to look for proper gluten development.
Two minutes of knead time with a stand mixer is equal to 10-12 minutes by hand.
Can all purpose flour be substituted for bread flour?
It can. You will need to knead the dough longer to reach window pane because all purpose flour has less gluten.
Can I make this single loaf with whole wheat flour?
You can substitute half the white flour for whole wheat, but not all of it. You’d need a recipe written exclusively for whole wheat to do that.
I only have instant yeast. Can I use it?
Yes you can. I always recommend that beginners activate their yeast just like active dry. Instant yeast can be added directly to the flour, but most beginners fail to warm the flour and other liquid ingredients and this results in a failed loaf. Instead, just add it to water and move on once it foams.
Why is there egg in this recipe? Can I leave it out?
Eggs provide rise and moisture in breads. There have been some readers who have left the egg out and had good results. You are welcome to give it a try, though I encourage you to use it if you can.

How to build more flavor in to your single stand mixer loaf bread
If you are craving a super yeasty flavor, feel free to do your rises in the fridge. The longer a dough can sit, the more yeast flavor it will have. Place your mixer bowl in the refrigerator until the dough doubles–maybe 4 to 6 hours.
I don’t recommend leaving it overnight because commercial yeast can actually digest the gluten and leave you with a big soupy mess.
Your second rise can also be done in a cool location for further flavor development.
Ideas for flavor variations
This dough is versatile! Shape it in to rolls and tuck them in a round cake pan to rise or make cloverleaf or other shapes. Check out these 9 Ways to Shape Dinner Rolls.
Cinnamon sugar or cinnamon raisin
When pressing the dough into a rectangle for the loaf pan, spread the dough with a bit of butter and sprinkle on a mixture of 3 tablespoons sugar and 1 teaspoon cinnamon. Raisins could also be added here. Then roll up and rise as usual.
Cinnamon Rolls
Spread the dough with butter and cinnamon sugar as listed above, adding in two tablespoons brown sugar. Roll the dough and cut slices 1-2 inches thick. Lay flat in a greased baking dish and let rise; bake as instructed cutting the bake time to about 20 minutes.
Raisins or Nuts
Knead in raisins or nuts in after you reach window pane. Add 3/4 cup to 1 cup depending on preference and mix a few seconds to distribute them.
Cheese, Garlic and Herbs
Work these in to the dough for a few seconds after reaching window pane. A blend of 3/4 cup parmesan or white cheddar, and roasted garlic would be delicious!
Other ideas include olives, sun dried tomatoes, jalapenos and cheddar cheese chunks–so many great ideas!
Adding ingredients means a slower rise time
Remember that adding other ingredients to your dough also adds weight. That means your dough will need more time to “lift” those ingredients as it rises so plan for rise times to take longer.

Single Loaf Bread in a Stand Mixer
Equipment
- Stand Mixer
Ingredients
- 1 cup warm water 216 grams , 110 to 115 degrees
- 2 1/4 teaspoons active dry yeast 7 grams/1 packet
- 3 tablespoons sugar 50 grams
- 1 egg
- 2 tablespoons flavorless oil 20 grams, avocado or vegetable oil
- 3 1/2 cups bread flour 470 grams
- 3/4 teaspoon sea salt 4 grams
Instructions
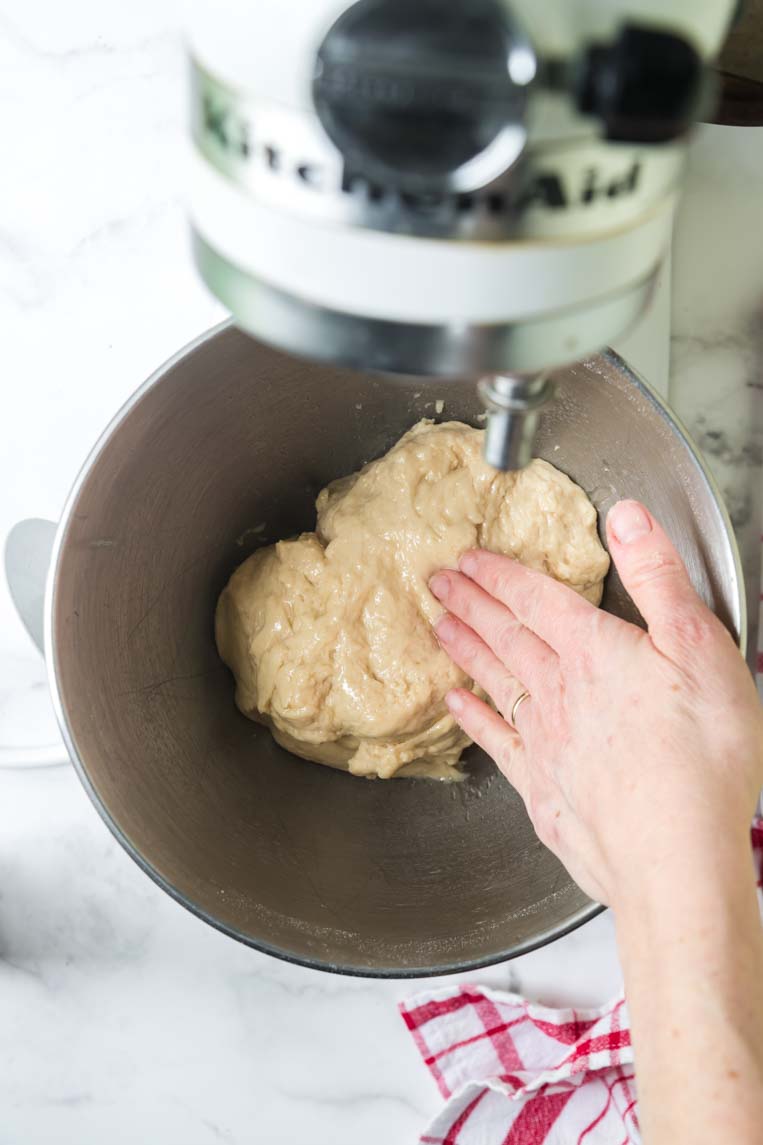
- In the bowl of your stand mixer, mix the water and yeast. Stir to combine and set aside to foam. About 5 minutes. Once the mixture begins to foam, you can proceed.

- Add the sugar, egg, oil and stir on low with the paddle attachment to combine.
- Add the flour and salt and mix on low to combine, then switch the dough hook.
- Knead on medium low (speed 2) until the dough cleans the sides of the bowl, clings to the dough hook and reaches window pane about 2 to 4 minutes total, but check your dough often. (See Note 1)
- Remove the dough hook and pat the dough lightly with oil or spray with cooking spray. Cover and let rise in a warm area until doubled. This may be 1-2 hours depending on your environment. Bread rises best at 70-75 degrees.
- Grease a 9×5 loaf pan and set aside.
- Once the dough is doubled, transfer the dough to a floured work surface and use your hands to press the dough into a rectangle about as wide as your loaf pan. Roll the dough like a sausage starting from the wide end and place it in the pan seam side down.
- Let rise uncovered until the dough is 1 inch above the top of the pan.
- Bake on the center rack close to the oven door at 400 for 25-30 minutes, tenting with foil halfway through baking. If you want to take the temperature of your bread, it should be between 180 and 190 degrees.
- Transfer to a wire rack to cool completely, rub the crust with butter while hot for a softer loaf.


I made this yesterday and couldn’t believe how well it turned out! The 2nd rise had me a little worried because it was uncovered and my oven was slightly warmed beforehand (to about 80ish degrees F) to help it rise quicker. The top felt kind of hard after about an hour so I thought I accidentally had the oven too warm or it dried out the dough. After baking it exactly like you said to, I was blown away by how golden brown the crust was without anything being brushed on prior to that. The additional butter on the crust right after it came out of the oven really did help the crust stay soft (I waited to leave this comment until today to see what the bread looked like 24 hours later). This recipe is officially being added to my favorite collection! Thanks for sharing it!
I’m so glad you enjoyed it Steff! I hope you’ll enjoy this recipe often!
Just started the first rise, but vey pleased with how it came together so far. My first foray since breaking some bones in a fall about 1 1/2 years ago, so very happy.
I did not have bread flour, per se, but added a tablespoon each of whole milk powder and vital wheat gluten.
I plan to bake it in a round ceramic pan that has turned out great boules in the past and using our forced hot air infra red cooker. Ovens as such are kind of rare in households here.
Wish us luck!
I was wondering why the sugar is not added to the yeast at the start? as other recipes I have seen do that for the yeast to proof.
Hi Sonia, Yeast strains that we buy commercially today are vigorous enough that adding sugar to the yeast isn’t really necessary. You can take part of the sugar from the recipe and use it if you want to, but it will activate with or without it. –Rachel
This is the best loaf I’ve made. New kitchenaid owner.
I’m so glad it worked out well for you Deanna!
Making bread from scratch always intimidated me. I have had my stand mixer for a while when I found your recipe. Sounded easy so I gave it a whirl. I love everything about your recipe. Slightly crispy crust, great taste and fluffy inside. Thanks for helping me get past my fear of baking bread.
I’m so glad you were successful Carolyn! Great job. 🙂
Easy Bread to make and very cost effective but also nice mouth feel and taste nice!
I have been trying to make a decent loaf of bread for 35 years. I have FINALLY found my go-to recipe. This one is simple and consistent. It’s clearly written and easily followed. (And it works well with my work-from-home schedule.) The results are both beautiful and scrumptious. I cannot thank you enough. I didn’t think I would ever find a recipe that I would consider my everyday one.
Julie I’m so glad this recipe works well for you! 35 years was a long hunt–I wish bread teachers kept things simple. Congratulations on your success! –Rachel (The Dough Dabbler)
Loved it. Was looking for the recipe to make it again and glad I found it. I was surprised to see so many different variations on cooking temps, oil or butter, eggs or milk. I’m so glad I started with yours because it was incredibly easy with less steps and bowls. Today I’m gonna try it with butter because I love it. Any tips on getting the perfect thin slices? I used a serrated knife but it wasn’t as even as I like. I noticed mine lost its moisture really fast so I’m going to wrap it tighter
Hi Kim, Yes homemade bread will dry out quite quickly–about three days max is about it’s shelf life. You’re welcome to use butter but know that using solid fats in bread does create a slightly more crumbly final result in the bread. For thin slices, I find that waiting 12-14 hours to slice mine helps it firm and the texture set fully. I know that’s a long time to wait but it does help. Also making sure that your knife is long enough and sharp enough. There are also a variety of bread slicing guides on sites like Amazon that you can buy but I have found the slices to be too thick with those methods. If you plan to freeze your bread for longer term storage, slicing it just slightly frozen can also be helpful. Then you can re-stack the slices and store in an air tight container like a Lock and Lock bread container in the freezer. –Rachel
Thanks for the recipe! This is by far the best recipe that I have tried for making bread with the least amount of hassle. For my second attempt, I added 2 tsp diastatic malt powder, which turned out fluffier than the first loaf I made. It may have been the higher protein content as I did use an upgraded bread flour for my second loaf. ~Mark
Bread flour is always best but I’m sure the malt powder also supported texture as well. I’m so glad you enjoyed it! –Rachel
I need to know the temperature used in baking recipes celsius or fahrenheit
thank you
All recipes are in Fahrenheit.
Always Fahrenheit.
Fantastic and easy! I used honey instead of sugar and I never got it to windowpane and yet it turned out incredibly soft and flavorful.
Great job! I’m so glad you enjoyed it!
Thank you for the great recipe.My all family enjoyed very much- delicious bread.
You’re welcome Savina!
Made this, but used melted butter instead of oil. Also used a duck egg in mine.
Just used this recipe in my 2nd attempt at bread after a pretty failed 1st go at a different recipe and my god i am so happy I found this! I am a new Cuisinart stand mixer user and now I’m so happy I have found a great and easy recipe for bread 🙂
Way to go Lisa!! So glad you found us here!
I made your bread for the first time and it was fantastic. I just wanted to say thank you thank you thank you.
Thank you for this recipe. I was struggling to find a one loaf recipe and this one is really good. The egg adds some richness and the directions are not difficult. I do have to knead in the stand mixer a little longer to get to window pane, but once it does, it always bakes perfectly.
Thank you for sharing such an easy recipe for a sandwich loaf! The only question that I have is does it really need 3 Tbls of sugar? Do you think that I could just use 1 Tbl or eliminate it all together? I just thought that it had sweetness to it that I could do without.
Hi Tina, Sugar in this type of bread is serving a larger purpose than just sweetness. It adds moisture and supports proper texture. You’re welcome to reduce it but you’ll find the bread drier and more crumbly. –Rachel
Hi Rachel,
I just found this recipe and I am getting ready to try it. I do have a question regarding the flour amount. The recipe calls for 3-1/2 cups or 470gm of flour, but my bead flour bag states 1 cup of flour is 120gms. That would equal 420 grams. Could you clarify for me before I begin? Baking bread is new to me and looking forward to the outcome.
Hi Cindy, yes. So most baking authorities including King Arthur established the weight in grams of a “cup” of flour a long time ago. The recipe I have here was taught to me in cups only by women who had never even thought about a scale. I know how it should look. So, when I converted it for the internet, I wrote the customary (cup) measurements at it was taught to me and the grams as it turned out they actually were when I tested it. Using cup measurements is literally the most inaccurate thing ever. LOL. So please go by the recipe as written here and not by the back of your flour bag. Thank you! –Rachel (The Dough Dabbler)
Does parchment paper need to be used?
If you don’t trust your loaf pan not to stick, then I would.
Can Instant Yeast be used instead of Active Dry? Also wondering about just using my breadmachine on the ‘Dough’ cycle instead of the mixer, then baking in the oven…
Yes you can use instant. I don’t use any bread machines and never have so I can’t really advise you on that but it should work I would think.
This is my husband’s new favorite bread, even over the sourdough. Thanks for a great recipe. I do wish there was a picture not just of the rectangle, but which way you roll it. I typically roll the long side but your notes may be the same and say wide… length and width so wide is a little confusing
Thanks Kim! I’ll make a note to clarify that. I am getting that dough to the width of the loaf pan and then rolling it up so that it stays that size…not sure if that makes sense. I’ll try to add photo in the future!
This is my go to recipe. I make a loaf every week.